Saturday, April 22, 2017
Add copy to and move to options under right click menu for all files and folders
Add copy to and move to options under right click menu for all files and folders
Ok ,leave all that now we can start this trick,
a registry editor window will be opened , now browse to the below key
HKEY_CLASSES_ROOT*shellexContextMenuHandlers
Right click the ContextMenuHandlers key and choose New>Key.
Name the new key “Copy To” (without the quotes).
Repeat the above and create another new key named Move To
Select the Copy To key and in the right hand pane, double click “Default”
Enter this clsid value as the value data:
{C2FBB630-2971-11d1-A18C-00C04FD75D13}
Next , select the Move To key and in the right hand pane set the default value to:
{C2FBB631-2971-11d1-A18C-00C04FD75D13}
And thats it you are done , now you can check this by right clicking any file ,you can see as below screenshot , there will be 2 new options
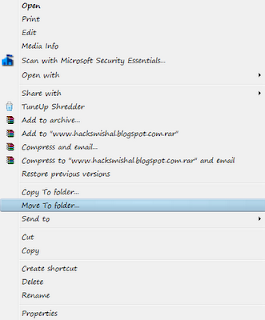
browse to the following key
HKEY_CLASSES_ROOTDirectoryshellexContextMenuHandlers
Right click ContextMenuHandlers and create a new key named Copy To.
Right click it again and create another new key named Move To.
left click on the right hand pane, add the same default values as you did for Files:
For Copy To:
{C2FBB630-2971-11d1-A18C-00C04FD75D13}
For the Move To:
{C2FBB631-2971-11d1-A18C-00C04FD75D13}
Exit the registry and you are done.
now you can easily copy or move any file or folder with eaze.If this article found useful for you, please write your comments ,your feedbacks are always precious
Available link for download

Saturday, March 25, 2017
Add Fixed Floating Adsense AD on Post Side in Blogger
Add Fixed Floating Adsense AD on Post Side in Blogger
You might have seen these types of scrolling advertisement in many blogs, when ever person reads your post and starts scrolling your blog post to the bottom the ad scrolls side by side hence increasing your clicks and conversion, making you a little more money. Well the widget I have created is inspired from the floating sharing buttons widget I posted earlier. But now I have added a simple adsense ad code that could be replaced with any other advertisement or banner whatever.
Available link for download
Thursday, March 9, 2017
Add Flood Blocking Software A new trendz for hacking ids
Add Flood Blocking Software A new trendz for hacking ids
Hackers are spreading new application with the names such as Add Request blocker/Add Request Cleaner and so on which steal the password of the user. The Hackers first target an id and send Add Request flood. That makes the user feel difficult to ignore the requests. Keeping this in point, the Hacker sends the hacking file to the user, User starts using the application thinking that he/she can remove the add requests from the list. Once the uses uses the application, the password will be send to the application developer. Avoid using applications which are sent by others or Applications provided in insecure websites :) Happy Nimbuzzing
Available link for download
Friday, February 24, 2017
Add a delete equivalent of kill region and kill line keys C w and C k in emacs
Add a delete equivalent of kill region and kill line keys C w and C k in emacs
A very frequent editing operation I find myself doing is, for multiple files, find something, delete it and replace it with something else. Usually the replacement is done using paste. Pretty simple. Duhrrr. Today again I am fixing up multiple files repeatedly with same or similar changes.
This can be sped up using macros. Start from emacs dir browse a macro can visit each file, jump to start of buffer, do the needful replace, save the file and go back to previous buffer (browse directory) and advance to next file ready for macro to run again.
e.g.
start macro: "C-x ("
select file: "Enter"
jump to start of buffer: "C-Home"
replace "M-x replace-regexp xxxx yyyy" (or "M-x my-custom-repacement-func" see below)
save: "C-x C-s"
back to previous buffer "C-x b Enter"
advance to next file "DownArrow"
finish macro: "C-x )"
In emacs the behaviour of kill-ring makes pasting in the same copied line awkward.
C-w or C-k copy the killed text to kill-ring moving what you want to paste down in the ring.
Using command delete-region to CUT text without copying it into the kill-region solves the difficulty, but the lack of a key binding to delete-region makes it easy to overlook or forget about!
C-space go to end of text M-x delete-region
is harder than
C-space go to end of text C-w
or
C-k
Add a delete equivalent of kill-region and kill-line keys C-w and C-k as follows.
Bound to keys C-v and C-z.
;; A keybinding to delete-region gives a good "Windows CUT Ctrl-x equivalent".
;; What keybinding to use is awkward to choose.
;; using C-v "Windows PASTE Ctrl-v" is quite a subversive option.
;;  C-v = scroll up in emacs which I have no use for.
(global-set-key (kbd "C-v") delete-region)

;; To have also a "Windows CUT" alternative to C-k (kill-line) this can be done:
(defun delete-line () "delete line, take it out of kill ring. bind this func to C-z"
 (interactive)
 (setq last-command delete-line)
 (kill-line)
 (setq kill-ring (cdr kill-ring))
 (setq kill-ring-yank-pointer kill-ring)
 (setq last-command delete-line)
)
(global-set-key (kbd "C-z") delete-line)
;; without setting of last-command 2+ C-zs mess up kill-ring
============================================================
other recently used quick replace elisp funcs:
(defun replace-ucolc () "replace old olc suc and ssuc ids with valid ones"
 (interactive)
 (replace-regexp "OLC.UC.29.?b" "SYS.UC.29")
 (replace-regexp "SYS.UC.151b" "SUB.UC.DP.1")
)
(defun replace-olctest-timeouts2 () "replace hardcoded numbers in func calls in about 20 olc tests with variable"
 (interactive)
 (replace-regexp "(olc::checkForOLCState .*"WAIT.*COMPLETED" +)240" "1 $olc::icWaitForDCGAReady")
 (replace-regexp "(olc::checkForOLCState .*"COMPLETED" +)240" "1 $olc::icWaitForOLCCompletedAfterNodesReady")
 (replace-regexp "(olc::checkOLCControlState .*->completed} +)60" "1 $olc::icWaitForOLCCompletedAfterNodesReady")
 (replace-regexp "(olc::checkOLCControlState .*->completed} +)6" "1 $olc::icWaitForOLCCompletedAfterCompleted")
 (replace-regexp "(olc::checkDSSEState .* +)420" "1 $olc::icWaitForDatapathReadyAfterOLCCompleted")
 (replace-regexp "(olc::checkForNodeState .*"OLC.*DC_GA.*READY" +)180" "1 $olc::icWaitForDCGAReady")
)
Available link for download
Saturday, January 7, 2017
Add some Styles Customize Ordered List ol li using CSS
Add some Styles Customize Ordered List ol li using CSS
In blogging organizing everything is very necessary, it makes your blog neat and clean and side by side gives your readers proper understanding about the content. Now personally I like to add ordered list in my step by step post like I am going to do it now. This helps my readers to understand every step in proper way and they know that 1 instruction is over and other is next to be followed.
Available link for download
Wednesday, December 21, 2016
Add Bold Italic and Strikethrough Styles in WhatsApp
Add Bold Italic and Strikethrough Styles in WhatsApp
WhatsApp recently streamed the incoming of a new BETA testing app for its social networking application that will allow you to do alot more things fast and in style. We are going to see some new styles that you can add to your text like Bold, Italic and Strikethrough. Well this is going to be great in case you want to make your text much more appealing to your friends.
Available link for download
Sunday, November 20, 2016
Tuesday, November 15, 2016
Add Your Name or Application to right click Of My Computer
Add Your Name or Application to right click Of My Computer
Caution ..
As it is related to Windows regisrty it can be dangerous
so,Try This at ur own risk
To write your name on right click application
please follow the steps.
1.Copy/Paste the following code in Notepad And then Save it as .reg
Windows Registry Editor Version 5.00
[HKEY_CLASSES_ROOTCLSID{20D04FE0-3AEA-1069-A2D8-08002B30309D}shellRegistry Editor]
@="Your Name Or Name of the Application"
[HKEY_CLASSES_ROOTCLSID{20D04FE0-3AEA-1069-A2D8-08002B30309D}shellRegistry Editorcommand]
@="Location Of The Application"
2.Now edit it and then Type your name In
Eg:
[HKEY_CLASSES_ROOTCLSID{20D04FE0-3AEA-1069-A2D8-08002B30309D}shellRegistry Editor]
@="Rajesh"
3. If u want to get any application, once you click Your name or name of application
Then , Type the location Of the application Which u want to open In:
[HKEY_CLASSES_ROOTCLSID{20D04FE0-3AEA-1069-A2D8-08002B30309D}shellRegistry Editorcommand]
@="Location Of The Application"
For eg.C:Program FilesYahoo!Messengermessenger.exe
Thats It finally save it And then Run it .
------------------------------------------------------------
To add Application Control Panel
[HKEY_LOCAL_MACHINESOFTWAREClassesCLSID{20D04FE0-3AEA-1069-A2D8-08002B30309D}shellControl Panelcommand]
@="rundll32.exe shell32.dll,Control_RunDLL"
To add Application Add/Remove
[HKEY_CLASSES_ROOTCLSID{20D04FE0-3AEA-1069-A2D8-08002B30309D}shellAdd/Removecommand]
@="control appwiz.cpl"
To add Application Reboot
[HKEY_CLASSES_ROOTCLSID{20D04FE0-3AEA-1069-A2D8-08002B30309D}shell[Reboot]command]
@="shutdown -r -f -t 5"
To add Application Shutdown
[HKEY_CLASSES_ROOTCLSID{20D04FE0-3AEA-1069-A2D8-08002B30309D}shell[Shutdown]command]
@="shutdown -s -f -t 5"
Available link for download
Tuesday, November 1, 2016
Add Images or Links to GMail Signatures
Add Images or Links to GMail Signatures
Gmail now supports to add images in signatures.For that navigate to the Settings page, from there you can edit the signature for each account by changing the email address that appears in the dropdown menu.Currently, only the latest desktop version of Gmail supports rich text signatures and multiple signatures.


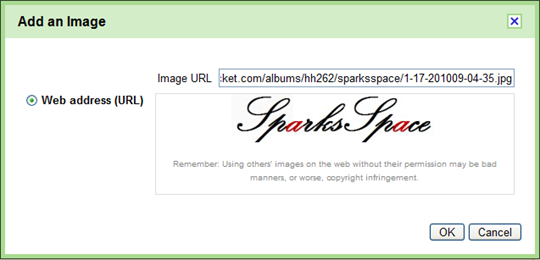

At present you can only include pictures and icons in the signature that are already hosted on the web and there’s you can not upload images from the computer straight into the signature.You can upload your pictures to flickr or picasa or photobucket and then give its URL to add signature.
Available link for download
Tuesday, October 25, 2016
Add new Record Android database SQLite p7
Add new Record Android database SQLite p7
Tutorial description: The product of this tutorial is to invoke (from MENU) another screen to insert a new record. The first screen is the list of all records. User is able to add a new record through this screen. The screenshots below is the output.
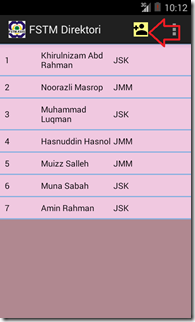


Before you proceed with the tutorial, you might want to read the previous tutorial - Update Record by long-press ListView - Android database SQLite (p6)
Download the complete code here 
STEP 1: Add a new screen named AddNewRecord
Right-click on the project name –>New –> Other… Select the Android Activity –> Blank Activity. Provide the new Activity (screen) name AddNewRecord


Provide the Activity Name as AddNewRecord, and hit Finish

STEP 2: Design the layout for AddNewRecord screen

The XML file
<RelativeLayout >="http://schemas.android.com/apk/res/android"
 >="http://schemas.android.com/tools"
 android:layout_width="match_parent"
 android:layout_height="match_parent"
 android:paddingBottom="@dimen/activity_vertical_margin"
 android:paddingLeft="@dimen/activity_horizontal_margin"
 android:paddingRight="@dimen/activity_horizontal_margin"
 android:paddingTop="@dimen/activity_vertical_margin"
 android:background="#FFCC99"
 tools:context=".AddNewRecord" >

 <!-- FILE activity_update_record.xml -->
 <TableLayout
 android:id="@+id/tableLayout1"
 android:layout_width="wrap_content"
 android:layout_height="wrap_content"
 android:layout_alignParentBottom="true"
 android:layout_alignParentLeft="true"
 android:layout_alignParentRight="true"
 android:layout_alignParentTop="true" >

 <TableRow
 android:id="@+id/tableRow6"
 android:layout_width="wrap_content"
 android:layout_height="wrap_content" >

 <ImageView
 android:id="@+id/imageView1"
 android:layout_width="wrap_content"
 android:layout_height="wrap_content"
 android:src="@drawable/ic_person_add_black_24dp" />

 </TableRow>

 <TableRow
 android:id="@+id/tableRow1"
 android:layout_width="wrap_content"
 android:layout_height="wrap_content" >

 <TextView
 android:id="@+id/textView1"
 android:layout_width="0dp"
 android:layout_height="wrap_content"
 android:layout_weight="1"
 android:text="Fullname"
 android:textAppearance="?android:attr/textAppearanceMedium" />

 <EditText
 android:id="@+id/txtnama"
 android:layout_width="0dp"
 android:layout_height="wrap_content"
 android:layout_weight="1"
 android:ems="10" >

 <requestFocus />
 </EditText>
 </TableRow>

 <TableRow
 android:id="@+id/tableRow2"
 android:layout_width="wrap_content"
 android:layout_height="wrap_content" >

 <TextView
 android:id="@+id/textView2"
 android:layout_width="0dp"
 android:layout_height="wrap_content"
 android:layout_weight="1"
 android:text="Department"
 android:textAppearance="?android:attr/textAppearanceMedium" />

 <EditText
 android:id="@+id/txtjbt"
 android:layout_width="0dp"
 android:layout_height="wrap_content"
 android:layout_weight="1"
 android:ems="10" />
 </TableRow>

 <TableRow
 android:id="@+id/tableRow3"
 android:layout_width="wrap_content"
 android:layout_height="wrap_content" >

 <TextView
 android:id="@+id/textView3"
 android:layout_width="0dp"
 android:layout_height="wrap_content"
 android:layout_weight="1"
 android:text="Phone"
 android:textAppearance="?android:attr/textAppearanceMedium" />

 <EditText
 android:id="@+id/txttelefon"
 android:layout_width="0dp"
 android:layout_height="wrap_content"
 android:layout_weight="1"
 android:ems="10"
 android:inputType="phone" />
 </TableRow>

 <TableRow
 android:id="@+id/tableRow4"
 android:layout_width="wrap_content"
 android:layout_height="wrap_content" >

 <TextView
 android:id="@+id/textView4"
 android:layout_width="0dp"
 android:layout_height="wrap_content"
 android:layout_weight="1"
 android:text="Email"
 android:textAppearance="?android:attr/textAppearanceMedium" />

 <EditText
 android:id="@+id/txtemel"
 android:layout_width="0dp"
 android:layout_height="wrap_content"
 android:layout_weight="1"
 android:ems="10"
 android:inputType="textEmailAddress" />
 </TableRow>

 <TableRow
 android:id="@+id/tableRow5"
 android:layout_width="wrap_content"
 android:layout_height="wrap_content" >

 <Button
 android:id="@+id/btnsavenew"
 android:layout_width="0dp"
 android:layout_height="wrap_content"
 android:layout_weight="1"
 android:text="Save New Staff" />

 </TableRow>

 </TableLayout>

</RelativeLayout>
The Java code to perform Save New Record.
AddNewRecord.java
package net.kerul.fstmdirektori;

import android.net.Uri;
import android.os.Bundle;
import android.app.Activity;
import android.content.ContentValues;
import android.content.Intent;
import android.database.Cursor;
import android.database.sqlite.SQLiteDatabase;
import android.view.Menu;
import android.view.View;
import android.view.View.OnClickListener;
import android.widget.Button;
import android.widget.EditText;

public class AddNewRecord extends Activity {
 private EditText txtnama, txtjbt, txttelefon, txtemel;
 private Button btnsave;
 private DBHelper mHelper;
 private SQLiteDatabase dataBase;
 private String id,name,telno,email,dept;//to hold the data strings

 @Override
 protected void onCreate(Bundle savedInstanceState) {
 super.onCreate(savedInstanceState);
 setContentView(R.layout.activity_add_new_record);

 mHelper=new DBHelper(this);
 dataBase = mHelper.getWritableDatabase();

 //initiate all textbox container to hold the data for the staff
 txtnama=(EditText)findViewById(R.id.txtnama);
 txtjbt=(EditText)findViewById(R.id.txtjbt);
 txttelefon=(EditText)findViewById(R.id.txttelefon);
 txtemel=(EditText)findViewById(R.id.txtemel);

 btnsave=(Button)findViewById(R.id.btnsavenew);
 btnsave.setOnClickListener( new OnClickListener(){
 public void onClick(View v){
 //capture amendment
 name=txtnama.getText().toString();
 telno=txttelefon.getText().toString();
 email=txtemel.getText().toString();
 dept=txtjbt.getText().toString();

 saveData();
 }
 });//end btnsave setOnCLickCListener
 }

 //save new record
 private void saveData(){
 ContentValues values=new ContentValues();

 values.put(DBHelper.NAMA,name);
 values.put(DBHelper.JBT,dept);
 values.put(DBHelper.EMEL,email );
 values.put(DBHelper.TELEFON,telno );

 System.out.println("");

 //save new record to the database into database
 dataBase.insert(DBHelper.TABLE_NAME, null, values);

 //close database
 dataBase.close();
 finish();


 }

}
STEP 3: Add MENU on ActionBar to call the AddNewRecord screen

Get back to the main screen (DisplayList.java). Add the onCreateOptionsMenu and onOptionsItemSelected in the DisplayList.java

DisplayList.java – updated
package net.kerul.fstmdirektori;
import java.util.ArrayList;
import android.app.Activity;
import android.app.AlertDialog;
import android.content.DialogInterface;
import android.content.Intent;
import android.database.Cursor;
import android.database.sqlite.SQLiteDatabase;
import android.os.Bundle;
import android.view.Menu;
import android.view.MenuItem;
import android.view.View;
import android.view.View.OnClickListener;
import android.widget.AdapterView;
import android.widget.AdapterView.OnItemClickListener;
import android.widget.AdapterView.OnItemLongClickListener;
import android.widget.ListView;
import android.widget.Toast;
public class DisplayList extends Activity {
private String id;//to hold selected stafid
private DBHelper mHelper;
private SQLiteDatabase dataBase;
//variables to hold staff records
private ArrayList<String> stafid = new ArrayList<String>();
private ArrayList<String> nama = new ArrayList<String>();
private ArrayList<String> jbt = new ArrayList<String>();
private ListView userList;
private AlertDialog.Builder build;
@Override
public void onCreate(Bundle savedInstanceState) {
super.onCreate(savedInstanceState);
setContentView(R.layout.activity_display_list);
userList = (ListView) findViewById(R.id.List);
mHelper = new DBHelper(this);
//click to update data
userList.setOnItemClickListener(new OnItemClickListener() {
public void onItemClick(AdapterView<?> arg0, View arg1, int arg2,
long arg3) {
Intent i = new Intent(getApplicationContext(),
ViewRecord.class);
i.putExtra("stafid", stafid.get(arg2));
startActivity(i);
}
});//end setOnItemClickListener
//long-press to update data
userList.setOnItemLongClickListener(new OnItemLongClickListener() {
public boolean onItemLongClick(AdapterView<?> arg0, View arg1,
final int arg2, long arg3) {
Intent i = new Intent(getApplicationContext(),
UpdateRecord.class);
i.putExtra("stafid", stafid.get(arg2));
startActivity(i);
return true;
}
});//end setOnItemLongClickListener
}
@Override
protected void onResume() {
//refresh data for screen is invoked/displayed
displayData();
Toast.makeText(getApplicationContext(), "TAP on rescord to view complete info, LONG-TAP to update...", Toast.LENGTH_LONG).show();
super.onResume();
}
/**
* displays data from SQLite
*/
private void displayData() {
dataBase = mHelper.getWritableDatabase();
//the SQL command to fetched all records from the table
Cursor mCursor = dataBase.rawQuery("SELECT * FROM "
+ DBHelper.TABLE_NAME, null);
//reset variables
stafid.clear();
nama.clear();
jbt.clear();
//fetch each record
if (mCursor.moveToFirst()) {
do {
//get data from field
stafid.add(mCursor.getString(mCursor.getColumnIndex(DBHelper.STAFID)));
nama.add(mCursor.getString(mCursor.getColumnIndex(DBHelper.NAMA)));
jbt.add(mCursor.getString(mCursor.getColumnIndex(DBHelper.JBT)));
} while (mCursor.moveToNext());
//do above till data exhausted
}
//display to screen
DisplayAdapter disadpt = new DisplayAdapter(DisplayList.this, stafid, nama, jbt);
userList.setAdapter(disadpt);
mCursor.close();
}//end displayData
@Override
public <Available link for download