
Monday, October 31, 2016
3D Dual head in gutsy with ATI X200 some troubles and solutions
3D Dual head in gutsy with ATI X200 some troubles and solutions
I already had dual head up and running with Edgy, which was quite easy.
When I upgraded to Gutsy, things became more complicated.
The dual screen worked only in clone mode, without any way to have a proper dual screen.
So, I had to google a lot, and finally came to a solution.
First: enable 3d for ATI X200 (not strictly necessary for dual head, but nice nonetheless).
I followed Ubuntu Gutsy installation guide, using the manual installation method.
Here it is:
Method 2: Install the Catalyst 7.11 Driver Manually
* Note: This is just an alternative installation method for the section above. It might help if you still get DRI missing errors.
* Note: If you are running the -rt kernel, you will fail to compile the kernel module with "FATAL: modpost: GPL-incompatible module fglrx.ko uses GPL-only symbol __rcu_read_lock".
Download the ATI driver installer: ati-driver-installer-7-11-x86.x86_64.run (this installer is for 32bit and 64bit systems)
Change to the download directory. Make sure that you have the universe and multiverse repositories enabled in /etc/apt/sources.list before doing these steps.
There is a detailed manual with screenshots at Ubuntu Wiki.
By default, Ubuntu did not enable the Universe and Multiverse repositories, but now in Gutsy, both Universe and Multiverse are activated by default.
Install necessary tools:
sudo apt-get update
sudo apt-get install module-assistant build-essential fakeroot dh-make debhelper
debconf libstdc++5 linux-headers-generic
Create .deb packages:
sudo bash ati-driver-installer-7-11-x86.x86_64.run --buildpkg Ubuntu/gutsy
note: if this step fails with a signal being caught, and you are running the script on an NFS-mounted directory, copy it to a local partition, and it will work.
If this step fails on amd64/x86_64 with a No such file or directory message about missing files in X11R6/lib, follow these instructions and come back here.
Blacklist old fglrx module from linux-restricted-modules:
As Ubuntu Gutsys linux-restricted-modules package includes the fglrx module from an old driver version (8.37.6), we have to blacklist this module to make sure the new kernel module which is needed by the new driver will be used instead.
Ubuntu/Gnome users type in:
gksu gedit /etc/default/linux-restricted-modules-common
Kubuntu/KDE users type in:
kdesu kate /etc/default/linux-restricted-modules-common
Add "fglrx" to the line "DISABLED_MODULES"
File: /etc/default/linux-restricted-modules-common
DISABLED_MODULES="fglrx"
Please note that after the modification above, the "Restricted Driver Manager" will signal "ATI accelerated grapichs driver" not enabled (unticked). This is perfectly correct. At the end of the installation procedure it will signal in Status: "in use" (green light), but NOT enabled. It simply means that the fglrx module contained in the linux-restricted-modules package is not enabled, but another fglrx module (7.11) is in use.
Install .deb packages:
sudo dpkg -i xorg-driver-fglrx_8.433-1*.deb fglrx-kernel-source_8.433-1*.deb fglrx-amdcccle_8.433-1*.deb
* Note: If you get a Bad file descriptor message concerning the xorg.conf file try switching user to root and repeating the same command without sudo. This might be valid for the following commands too. (Ubuntu Gutsy installs with no password set for root by default. You can set a password for the root by typing sudo passwd root first.)
* Note: If you have a 64 bit install, the above dpkg command will likely complain that "Errors were encountered while processing: fglrx-amdcccle". This is because of a dependency of the amdccle package on 32 bit libraries. If you recieve this error, issue the following command after the above dpkg command, which will force the installation of all of the 32 bit dependencies, and then the amdccle pacakge:
sudo apt-get install -f
Remove any old fglrx debs from /usr/src/:
sudo rm /usr/src/fglrx-kernel*.deb
Fix broken dependencies
* Note: You only need to do this if you have installed previous versions of these drivers using this method before.
sudo apt-get -f install
Compile the kernel module:
sudo module-assistant prepare,update
sudo module-assistant build,install fglrx -f
sudo depmod -a
Its necessary, because sometimes this file is written by other packages, and so theres no 3D acceleration. Check that the file /lib/modules/$(uname -r)/misc/fglrx.ko has been created.
Create the following folder
sudo mkdir /lib/modules/$(uname -r)/volatile
Note: the volatile directory might already exist at this stage then simply continue with the next step.
Create a symbolic link
sudo ln -sf /lib/modules/$(uname -r)/misc/fglrx.ko /lib/modules/$(uname -r)/volatile/fglrx.ko
NOTE : On my Gutsy install, after a reboot this link was always removed automatically leaving me without an fglrx module loaded, and thus no ATI rendering. There have been several ways of getting around this suggested here, and here is the one that worked for me:
sudo gedit /etc/init.d/ati-module-fix
And put this in it:
#!/bin/sh -e
# For loading ATI display drivers
ln -sf /lib/modules/$(uname -r)/misc/fglrx.ko /lib/modules/$(uname -r)/volatile/fglrx.ko
exit 0
Make it executable
sudo chmod ugo+x /etc/init.d/ati-module-fix
Now, make this run before gdm (which starts with sequence number 13)
sudo update-rc.d ati-module-fix defaults 12
It is possible that gdm sequence number is different. To find the gdm sequence number:
ls /etc/rc2.d/
And substitute 12 in the previous command with gdm sequence number - 1.
IMPORTANT: You have to recompile the kernel module after each kernel update! (Note: This does not affect you until the next time you update your kernel.)
[edit] Configure the Driver
* Note Method 2 Users: Before you carry out this step you must reboot your machine. Or else the fglrx driver will not be in use on xorg.conf and using the aticonfig options will cause a memory dump and not intialise the Driver properly.
* Note: An alternative to the aticonfig --initial command is to edit /etc/X11/xorg.conf and replace the string "ati" with "fglrx" in the "Device" section. This way you wont lose your old "Screen" and "Monitor" settings. Afterwards you can use aticonfig for setting overlay etc. Another alternative is aticonfig --initial --force if you encounter issues with the first command.
sudo aticonfig --initial
Then:
sudo aticonfig --overlay-type=Xv
* Note: Is there an alternative to the previous step??
* Note: Alternative in the overlay-type to "Xv" can be "opengl" or "disable" if the TV-out makes problems in videos.
Finish the Installation
Now save any open document and reboot your system:
sudo shutdown -hr now
* Note: An alternative to rebooting is to restart the X Server by pressing your CTRL ALT BACKSPACE keys. You must remove any old kernel modules such as "drm" "radeon" or "fglrx" using the "rmmod" command. Example: sudo rmmod fglrx
Post-Installation Checks
Verifying
Run the following command to check its output to ensure the fglrx driver is installed properly:
$ fglrxinfo
display: :0.0 screen: 0
OpenGL vendor string: ATI Technologies Inc.
OpenGL renderer string: ATI Radeon Xpress Series
OpenGL version string: 2.1.7059 Release
The OpenGL vendor string should read ATI and not Mesa.
In the Gutsy installation, you will find also how to enable desktop effects (compiz & such), but I skipped that passage).
Secondly, I enabled big destop
I followed this howto from Ubuntuforums.org
ATI Big-Desktop
Dual Monitor Support With Binary, ATI-Only Big-Desktop
The following HowTo attempts to enable Dual Monitor support by enabling the Big-Desktop function of the Ati-only binary graphics driver.
System Requirements:
ONE Dual-Output ATI graphics card
Functional Fglrx Driver.
The following guide explains how to install and enable the fglrx driver: https://help.ubuntu.com/community/BinaryDriverHowto/ATI
Lets get started!!!
Update: Instead of Manually editing the Xorg file, Ive decided to attempt to write a HowTo based on the "aticonfig" tool. So, for about a week or so, I need individuals to try out this method and report the outcome. You can continue to post in this thread, or you can send me a private message to report the result. So, here goes nothing!
1. I know you have already saved a back of the xorg.conf file (you did, didnt you? ).:
Code:
sudo cp /etc/X11/xorg.conf /etc/X11/xorg.conf.backup
2. Next, we want X to be using the fglrx driver, so:
Code:
sudo aticonfig --initial --overlay-type=Xv
3. Now that the xorg.conf is fit to be edited, enter the following commands:
Code:
sudo aticonfig --desktop-setup=horizontal --sync-vsync=on --add-pairmode=Width0xHeight0+Width1xHeight1
Heres what each command means:
Code:
--desktop-setup=horizontal
this command enables Big-Desktop, and places the two monitors next to each other (left-right orientation). Other arguments that could replace it are:
Code:
--desktop-setup=horizontal,reverse <= flips your screens.
--desktop-setup=vertical <=places your monitors in a up-down orientation.
--desktop-setup=vertical,reverse <=flips your screens.
--desktop-setup=clone
--desktop-setup=single
Code:
--sync-vsync=on
this command prevents tearing during 3D rendering.
Code:
--add-pairmode=Width0xHeight0+Width1xHeight1
this command tells X what are the resolutions for Monitor1+Monitor2.
4. Now, you can experiment with your monitors without restarting X. First, you need to see how X identifies your monitors:
Code:
sudo aticonfig --query-monitor
Then based on the information provided by the query monitor command, replace STRING in the following command:
Code:
sudo aticonfig --enable-monitor=STRING,STRING
The values of STRING should be one of these:
Code:
none crt1 crt2 lvds tv tmds1 tmds2
5. If the enable-monitor command works for you, then you need to add it to the config file:
Code:
sudo aticonfig --force-monitor=STRING,STRING
Again replace STRING with the values given by query-monitor.
5. Now restart X (ctrl+alt+backspace) or reboot your computer.
Note: the --enable-monitor command DOES NOT change your configuration file (xorg.conf). Therefore when you restart X or your computer, it may or may not work.
If this method doesnt work, you may have to edit your xorg.conf manually (following the above-mentioned howto).
Hope this helps: it worked for me :-)
Available link for download
»» Resources of Inspirational Design Round Ups
»» Resources of Inspirational Design Round Ups
I just checked the top graphic design web pages and I found some of the cool Graphic Design Resource links. Here I will put some of the links, just check it out....
99 Sites ALL Designers Must Know About
Best Logo Design Resources
77 Resources to Simplify Your Life as a Web Designer
Places To Get Design Inspiration
30 Fonts That ALL Designers Must Own
Much more to come, all the resources are really nice and inspirational. All the resources that are given in that site are of good quality. Just check it out and make use of it.
Available link for download
6 cara mengoptimalkan Navigasi blog untuk SEO dan Menjaring pengunjung
6 cara mengoptimalkan Navigasi blog untuk SEO dan Menjaring pengunjung


Available link for download
Sunday, October 30, 2016
A Family in the Making
A Family in the Making


Available link for download
»» Photoshop Brushes Part 4
»» Photoshop Brushes Part 4
1. Fractals Lite
In this design the lightening effect is well used and a smoke like effect at the end sides which is really cool. Try this out....

Read More
2. Attack Brushes
In this brush the design is in such a way that it depicts shooting stars effect at the space. I think thats why it is called as attack brushes.
 3. Smoke Brushes
The silky effect and the chocolate design are the things that I like a lot in this design.

4. Punk Brushes
I searched for the human design in the photoshop brushes and I found out this. Just check this out...

Available link for download
2g 3g 3gs iPhone Unlocker Scurity Codes download Software Update 2010 2011
2g 3g 3gs iPhone Unlocker Scurity Codes download Software Update 2010 2011
2g,3g,3gs iPhone Unlocker Scurity Codes download Software Update 2010,2011

Available link for download
Saturday, October 29, 2016
5min 39sec animated story pearl a father daughter
5min 39sec animated story pearl a father daughter
found via laughing squid
Available link for download
Acronis Backup Recovery 11 0 17217
Acronis Backup Recovery 11 0 17217

Available link for download
11 Best Ways to Stop Using Plastic Save Mother Earth
11 Best Ways to Stop Using Plastic Save Mother Earth
Nowadays, plastic is practically all over and the non-biodegradable drug is eliminating countless animals on earth. Exactly what most individuals do not understand is that a great deal of oil is likewise being utilized to make the huge quantities of plastic we make use of, triggering more damage to the environment.
Here are some smart methods to reduce your usage of plastic. Due to the fact that seriously, it's unfair that a fish needs to pass away each time you go grocery shopping.
Available link for download
Friday, October 28, 2016
A few more reasons to love the Sony A200
A few more reasons to love the Sony A200
Continue to be very happy with my new Sony A200 and Minolta 35-70mm f4 combo. Went to Reefton (an hours drive from where I live) this weekend with the family, and we stopped at on old train memorial to have lunch. The kids started to play on the train and I couldnt help myself - perfect photo opportunity!

The sharpness of this lens is just crazy - and the colours are fantastic.
Having said that, the Alpha 200 isnt the fastest at processing images - takes a while to write to the card, even in jpeg mode. I do find myself having to wait for the images to write before I can review - which would be annoying if I was using it to shoot a wedding as my main camera. It wont replace my Nikon D300 anytime soon shooting weddings.

This image of Joshua has an almost HDR quality to it - even though its pretty much straight out of the camera. I have the Dynamic Range Optimiser on the Sony set to Standard, and I dont think its applied to the RAW file anyway? Anyway, the colours zing from this lens/sensor combination. Couldnt be happier with the results.

Available link for download
50 off Introduction to Internet of Things course coupon 10
50 off Introduction to Internet of Things course coupon 10
Internet and its evolution to the interconnection of people, processes, data, and things
Lectures 12
Video 1 hour
Skill Level All Levels
Languages English
Includes Lifetime access
30 day money back guarantee!
Available on iOS and Android
Certificate of Completion
________________________________
Internet of Things as a buzzword has caught the attention of all of us. This course will help you gain adequate knowledge on the Internet of Things. You will be able to understand the potential of the Internet of Things for our society, in terms of impact on the lives of billions of people and on the world economy.
You will also understand the underlying technology that powers the Internet of Things, as well as the challenges that comes with such technologies. We will explore many real-life examples of IoT devices that are commercially available, and you will have a glimpse of the future of the Internet of Things.
Explain what is the Internet of Things
Understand how Internet of Things devices interact together & with users
Learn about the protocols used by Internet of Things devices
Discover the different platforms that are available to develop applications
Learn about commercially available devices that are already using the Internet of Things
Understand the current challenges of the Internet of Things
Full details
Anyone with an interest in the Internet of Things, those who intend to know the potential and wish to build a career in the field.
GreyCampus Inc.
Introduction to Internet of Things
Hardware course coupon
IT & Software course coupon
Introduction to Internet of Things coupon
Udemy coupon
Udemy coupons
Udemy coupon code
Udemy courses
free coupons
Udemy free courses
Udemy free coupon
Available link for download
Thursday, October 27, 2016
5min 23sec clip on computer science is changing everything
5min 23sec clip on computer science is changing everything
found via @olliebray
Available link for download
2015 TUTORIAL TO REGISTRATION IN PAYONEER detailed process
2015 TUTORIAL TO REGISTRATION IN PAYONEER detailed process
2015 TUTORIAL TO REGISTRATION IN PAYONEER detailed process

STEP I: SIGN UP
Here I leave the link so that you register and earn U.S. D. $ 25

2.0 -. After you click on "SIGN UP", the following window will show, with 3 steps to complete
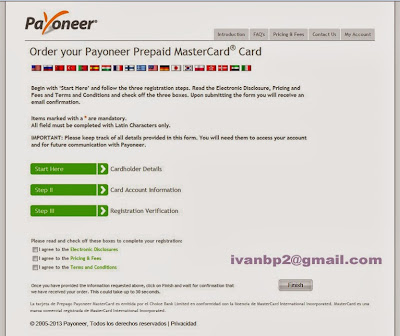

-First Name on your ID :
-Last name on your ID :
-Date of birth.
-Email adress: This email is important because here you will receive your registration confirmations and news from Payoneer.
-Retype Email adress:
-Country: Your country.
-Home Address: The address of your home or where you live.
-City :
-Zip/Postal Code: If you do not know google search or ask your mailman.
-Mobile Number : Here I placed my Mobil number thelefone with your code.
When finished, do not be on the Click on the "Click here and fill in this section ONLY if your shipping address is different from above or you want your card shipped to a PO Box"
STEP II: CARD ACCOUNT INFORMATION

Data to be completed are:
-Your User Name is: Your Email appears, I recommend you leave it there.
-Choose Your Password: minimum use a capital letter..
-Retype Your password:
-Security Question: You must choose a security question, write it down, for your safety..
There is a box, for Apply for US PAYMENT SERVICES, you click on it.
Now we go to "Step III"
STEP III: REGISTRATION VERIFICATION.
2.3.-Last step, check register, you click on "Step III" and we are shown the latest data to complete:
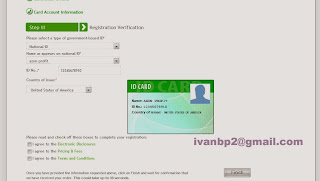
-Please select a type of government-issue
Available link for download
Wednesday, October 26, 2016
5 Tipe Sahabat Yang Harus Dihindari
5 Tipe Sahabat Yang Harus Dihindari
Kita bisa berteman dengan siapapun. Tetapi untuk menjadikannya sahabat, sebaiknya pilih-pilih. Kenali karakter seseorang yang sebaiknya jangan dijadikan sahabat, seperti dikutip iVillage:
Karakter: tidak segan-segan membatalkan janji secara mendadak dengan alasan yang selalu tidak jelas. Kebiasaan membatalkan janji ini seolah sudah menjadi bagian dari kepribadiannya. Satu atau dua kali mungkin bukan masalah. Tapi, jika setiap saat tentu membuat kita emosi.
Karakter: tidak bisa menjaga rahasia walau sudah berjanji tutup mulut. Jika dikonfrontasi, akan mati-matian membela diri dengan memelintir fakta. Biasanya baru akan minta maaf ketika sudah terpojok. Namun, cenderung akan mengulangi perbuatan serupa.
Karakter: yang menjadi pusat perhatiannya selalu diri sendiri. Semua harus membuat dirinya nyaman tanpa peduli perasaan orang lain. Jika sedang bertukar cerita, semua kalimatnya hampir selalu diawali dengan ‘Aku…’. Tipe ini cenderung kurang memiliki empati.
Karakter: setiap urusan adalah tentang menang dan kalah. Setiap kita melakukan sesuatu yang membuatnya merasa terancam, dia tidak akan segan-segan mencari cara menjatuhkan kita. Kompetisi memang sehat. Tapi, memiliki teman yang selalu memandang kita sebagai pesaing daripada sebagai teman sangat tidak sehat.
Karakter: cenderung memilih memutuskan persahabatan daripada harus berhenti mengkritik. Tidak satupun tindakan kita yang tidak lepas dari kritikannya. Saran yang diberikannya tidak pernah jauh dari awalan, ‘Seharusnya kamu…’ atau ‘Salah kalau kamu begitu karena…’.
referensi :
www.ad4msan.com
Available link for download
40 Facts that Describe True Nature of Lions PUNJABIS
40 Facts that Describe True Nature of Lions PUNJABIS
PUNJABIS with no doubt are the KING of Hearts, either its helping someone in need or friend with bad deed, they never back-off from any situation and certainly they have some really different styles to act and describe themselves when they are in public. One can easily Judge a PUNJABI by his DIET (yes they have some serious obsession with food, which is a good thing) We discover 40+ amazing facts about PUNJABIS that differentiates them from others.
Available link for download
ACDSee Pro 6 2 Build 212 Full Keygen
ACDSee Pro 6 2 Build 212 Full Keygen
Description
ACDSee Pro 6.2 Build 212 (x86-x64) + Keygen
ACDSee Pro 6.2 Build 212 Full Keygen | 70.9 MB
Packed with new features requested by professional photographers and advanced amateurs, ACDSee Pro 6 has everything you need to perfect your images, fast. Carry out digital asset management and all the essential tasks of your photography workflow, from import to final presentation, in one complete solution. Add in a powerful RAW 64 processing engine, improved color management, and more nondestructive processing tools--all running in a native 64-bit application thats Windows 8 compatible--and youll quickly see the difference in your images. Achieve stunning results, stay organized, save time. ACDSee Pro 6 gives you total photography control.
FEATURES
Take control of all your digital image assets:
• Whether you have thousands or tens of thousands of photos, an organized collection allows you to work smarter and faster. Your foundation for an effective workflow is digital asset management. ACDSee can handle both catalog- and browser-based workflows so you can manage your digital assets any way you like.
Hit the ground running:
• Why spend time importing your photos to a separate library when you dont have to? ACDSee connects you directly to the live folder tree on your computer so you can browse and work on your files without delay.
Streamline digital asset management:
• ACDSee is packed with time-saving photo management tools. Organize your photos as you import them from your camera or storage device. Catalog files for improved speed and performance. With NEW Batch Export, simultaneously perform a range of workflow steps. Convert formats and color space, resize and change filenames on batches of images. Customize your workspace to suit your individual style, and configure access to external editors with seamless simplicity.
Manage with flexibility:
• Organize your entire collection with ACDSees full support for EXIF, IPTC and XMP metadata. Set and edit information about your photos in accordance with IPTC Core 1.1 industry standards. Save time by modifying metadata for groups of photos at once, and creating presets for ongoing use. Add ratings, keywords, categories, color-labels (NEW!) and location data to your images for the ultimate in digital asset management.
Find images:
• Tap into ACDSees powerful array of search tools to quickly retrieve the photos you want. Find images based on metadata, file properties, date, event, keyword, ratings, color-labels and GPS location data. Build and save detailed searches. Filter, group and sort your results to quickly find that one photo you really need.
Ratings:
• Assign a rating of 1-5 to your images to help keep track of your best shots. The value you assign to your image in will be correctly applied in other applications you use; a 5 rating in ACDsee (the best!) is a top rating everywhere you upload.
Protect your Privacy:
• Use the Remove Metadata tool to keep your proprietary information private by stripping EXIF and IPTC metadata to protect the details of your locations, camera settings and equipment choices.
Present and preserve your work:
• Share your shots through e-mail services such as Gmail and Yahoo! Mail Plus, and upload to flickr, SmugMug, and Zenfolio. Conveniently optimize and upload images to web spaces you manage through FTP. Design and present slideshows of your images. Protect your work by archiving your collection to .zip folders or on disc, and backing up to external hard drives.
View your images, any way you want, fast:
• Put your photos front and center with ACDSees renowned viewing speed. View modes flexibility lets you appreciate your images in full screen or examine the finest details at pixel level. From JPEG to RAW, you can count on ACDSee Pro to display your photos exactly the way you want, fast. And you’ll be viewing your images in real time, from their original locations.
Examine details:
• Get up close and personal with your photos. Study your images using an arsenal of Zoom, Navigator, Magnifying Glass, and Histogram tools. See your images at full resolution with a single click.
Tag your shots:
• Accelerate your workflow by marking images for culling, processing, or further workflow steps with one-click visual tagging.
See and sort:
• Organize images as you review them. Categorize, add ratings and color-labels, and edit metadata on the fly.
• ACDSee supports over 100 different file formats, and RAW format support from new camera models is regularly added.
Stay focused as you scan:
• Flip quickly between images using the filmstrip window, and know exactly where you are within a large group of files.
Bring out the absolute best in your photos:
• ACDSee’s Develop mode is your non-destructive workshop where you can process your RAW images and apply non-destructive adjustments to your JPG and TIFF files. With the flexibility of ACDSee’s non-destructive editing, you’ll arrive at your desired result quickly and safely.
Get the best RAW results:
• See incredibly accurate default color, contrast and exposure right from the start of your RAW processing workflow. A wide RGB color gamut preserves your cameras vibrant colors for true-to-life representation. With color management control, you can be confident that what youre previewing reflects the desired color and tone of your RAW conversion.
Tune your images:
• Get the correct white balance, color, exposure and tonal distribution for your images in Develop mode. Add vibrance while protecting skin tones, and adjust saturation, brightness and hue on a color-by-color basis. Fine tune tonal distribution with the combined Tone Curves and Levels tool. Avoid color clipping during RAW conversion by leveraging your images histogram.
Get it Straight:
• Adjust geometry, and fix perspective, distortion and lens vignetting with full control over pixel size and resolution.
Reduce Noise:
• ACDSees advanced noise reduction algorithm lets you control different aspects of noise with the luminance and color sliders.
Achieve HDR Results with a single exposure:
• Get amazing single-exposure HDR results from your RAW images using the Lighting tool, powered by ACDSee’s patentedLCE (Lighting and Contrast Enhancement) technology.
Smarter Sharpening:
• A new user-controlled edge detection mask slider lets you focus the sharpening effect more to edges and textures without amplifying any pre-existing noise in areas with little detail.
Split Toning:
• The new Split Toning tool gives you complete control over the balance of tones in the shadows and highlights of a given scene, opening up a world of creative possibilities. Create sepia or tinted black & white, or add a tinted color to highlights and another to shadows to create a dramatic toning effect.
Perfect every color:
• Adjust saturation, brightness and hue on a color by color basis with Advanced Color, and leverage the information provided in the Histogram and Clipping Display overlay windows to perfect your images.
Contrast control:
• Gain the ultimate in contrast control with the combined Tone Curves/Levels tool. Use the Luminance Histogram to apply curves or to adjust the black-point, midpoint and white-point.
Bring out the best in your photos:
• Once your global non-destructive adjustments have been completed, add finishing touches at the pixel level to create brilliant images. Remove flaws, repair red eye, and add watermarks, text and vignettes with ease. Edit specific areas of images with Selections tools, and experiment with peace of mind knowing you can revert to your Developed photo or your original image at any time. Simultaneously apply edits to multiple photos, for the ultimate in express editing.
Eliminate flaws:
• Easily remove red eye from your photos. Full controls in the Red Eye Reduction tool allow you to adjust the color and the intensity for a natural look. Plus magically erase flaws, blemishes and other unwanted objects with the Photo Repair tool’s powerful Heal and Clone options.
Achieve the best light and color:
• Rescue photos that are too light or too dark with the Lighting tool, powered by ACDSee’s LCE (Light and Contrast Enhancement) technology. Instantly lighten shadows and reduce highlights in one click, or adjust individual sliders to fine tune every aspect. Change the tonal range and color balance of your photos with easy-to-use adjustment tools.
Take your photography to the edge:
• The new Split Toning tool gives you complete control over the balance of tones in the shadows and highlights of a given scene, opening up a world of creative possibilities. Create sepia or tinted black & white, or add a tinted color to highlights and another to shadows to create a dramatic toning effect.
Special Effects:
• Apply and fine-tune a range of pre-set effects quickly and easily with the Special Effects palette, now including: Lomo Effect:
• Apply the popular Lomo effect to give an edgy, retro feel to your photos.
Collage Effect:
• Creatively display your photo in a collage of prints.
Orton Effect:
• Give an ethereal, pastel-like touch to your portraits and landscapes.
Frame your work:
• Add vignettes to your images and get creative results by blending the vignette with blend mode and opacity adjustments.
Put your photos to work for you:
• Using the new Drawing Tools palette to add lines and shapes such as squares, circles and arrows to draw attention to certain elements in your image. You can also adjust the width, feathering and blending of your brush to create subtle or dramatic drawing effects. The Text Overlay tool adds to the creative and practical possibilities.
Stake your claim:
• Claim ownership of your images by adding watermarks. ACDSee’s Batch Edit tool makes it simple to apply watermark overlays to groups of photos at once.
Publish your work:
• Easily share and protect all your files with your free ACDSee Online account, including 10 GB of storage space*. Drag and drop images - including your RAW files - from ACDSees Online mode to your free, personal space in the cloud. Use ACDSee Online as a backup source or share your images with select contacts, facebook and twitter or the rest of the world.
Manage your photos online:
• Simply drag and drop select images or folders directly from ACDSee to your ACDSee Online space. You can also set up automatic uploading of content from specific folders. Complete other workflow tasks while your files upload in the background. Easily organize your photos in your online space account using hierarchical folders. You can even apply the same organizational structure you have on your desktop.
Display beautifully:
• The simple, clean, advertising-free interface of ACDSee Online puts the attention squarely on your photos. Nothing will detract from the beauty of your images.
Control access:
• By default, your photos on ACDSee Online are private and secure. Keep them under lock and key, or create public albums to share with the world. You also have the option of setting passwords to grant access to a select audience, and giving them the ability to download images at full-size.
See your Stats:
• ACDSee Online lets you see view counts, views by day and highest ranked photos, at absolutely no charge.
Share socially:
• Extend the reach of your photos. From ACDSee Online, you can e-mail selected photos or entire albums. Upload to Facebook or tweet about your album on Twitter. Display your photos in full-screen slideshows and order prints directly via MyPix. Showcasing your photos has never been this effortless.
Store safely:
• Your images are safe on ACDSee Online. The service is powered by Amazon Web Services, the same reliable and secure infrastructure that backs Amazon.com and its worldwide network of sites.
TusFiles
ACDSee Pro 6.2 Build 212 Full Keygen - 32bit
Available link for download

Hyper Brushes
Unreal Brushes v.2